
Click to Enlarge
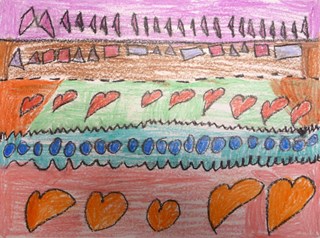
Exploring Line is one of the first projects I do with my kindergarten students. As one of their goals for the year is to learn about the five types of line: straight, curved, wavy, zigzag, and dotted, this particular project is how I introduce those line types to them in a straightforward way.
We begin with a breakdown of the five types of line through a PowerPoint presentation I show them using the SMART Board. During the presentation, I gauge their familiarity with each line type. Most often I find they know what the line is but may call it something different. A wavy line is sometimes called a curvy line. Frankly, I’m still torn whether to call a dotted line dotted, dashed or broken. Why? Well, dotted seemed the most logical name but little kids have a tendency to be very literal and it took some of them 5 minutes to draw one dotted line for me because they made tiny circles and then colored them in … all the way across the page. (Bless their hearts for their perseverance!) So, if you have some insight for me, please comment below.
The following classes breakdown the process of drawing the various line types across the page and coloring the final design. Spacing proved to be a challenge for many of them. A colleague in my district recommended I have them take 2-3 fingers and space them out that way. Alas, that proved a struggle too. In the end, I made a small mark on the side of their papers where they were to begin drawing their lines. This seemed to help most of my kids. Gotta be flexible, right?
Oh, why the spaces? Well, part of the project involves incorporating simple shapes (which the kids have already been learning about in their regular classes). Between each of the horizontal line types, the student would put a series of simple shapes, such as circles, squares, triangles, and the perennial favorite, hearts.
I have my students use pencil first and then trace over their lines with black crayon. The project is completed by coloring in the shapes first and then filling in the space between the different line types and around the shapes. And, there you have it: Exploring Line
Next Year
I have a couple of ideas to spice up this project up for next year. One is to have the kids demonstrate their prior knowledge on a piece of paper for me before I begin the PowerPoint presentation. I created a simple worksheet with boxes labelled ‘Straight’, ‘Zigzag’, etc. They will draw the line type in the corresponding box. Then I will begin my review of the line types. At the end of class, they will turn their papers over where I have the boxes listed again (in a different order, though) and show me what they’ve learned.
Another idea I may explore is for the kids to create a puzzle-like arrangement: use a pair of scissors to cut their papers vertically (maybe not?) and then glue the pieces down onto construction paper with a space between the cut pieces.
The last idea I’m going to consider is changing the medium to tempera paint. If I go this route, I will have to reconsider introducing shapes into the final project since it will require too much dexterity to draw small shapes with a paint brush. Though, I could enlarge the project to 12×18 versus 9×12. (Things that make you go ‘Hmm…’)


Pingback: Pop Art Mitten Matching | The Poetry of Seeing·