 Line type is a foundational concept I teach. Actually, it is referenced in all art curriculums usually through a specifically named line (e.g., zigzag, wavy). For me, it is sometimes paired with learning about shape. Other times it is tied to pattern. As my students and I discuss how lines appear in the real world, line type shows up in other work too!
This particular project had my Kindergarteners also learning how to:
- Trace a shape
- Create symmetry using line and color
- Cut out a complex shape
- Use bottled glue
Putting It All Together
Click to Enlarge
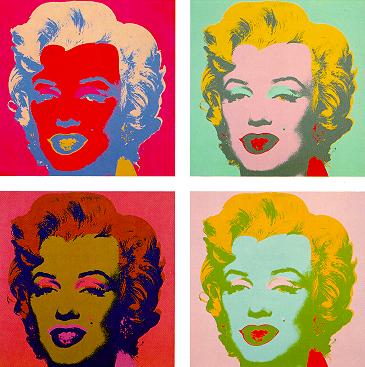
We discuss Andy Warhol and look at some of his work depicting the repetition of imagery. Immediately, the kids picked up on the bright colors and the use of an image over and over again when asked. As a class, we also talked about why an artist might be interested in doing that.
I had information on Pop Art but dropped it from our discussion because it is a heady topic and abstract notions of commercialism and messaging was not something the kinders really understood, even at the basic level that I was presenting it. No worries, you adapt and make do, right!?
Selecting an Image
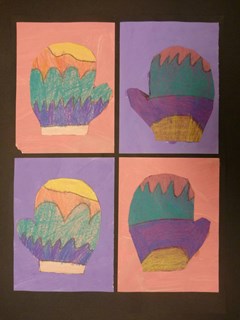 I choose the image of a mitten because Winter was pressing upon us here on the East Coast and I was hoping for something colorful and cheery to alleviate the gloom. Having said that, I also enjoy Wayne Thiebaud‘s work, and his use of candy was a close second to mittens.
Next year, I will probably create a series of templates (e.g., clothing items, types of shoes, kinds of candy, donuts) that will give my students more choices because I want them practicing tracing, cutting, and gluing more. These are important skills I found many of Kindergarteners need to practice.
Tracing an Image
 I created a mitten tracer for this project. I taught them how I trace objects (I use the analogy of riding a roller coaster: you have to stay on the track!) and then had a couple show me the way they do it differently. Most of the time the kids are really doing it the same way I am. They just want to participate in the demo so the extra few minutes isn’t a big deal as long as I can keep their attention!
Once they choose a colored piece of construction paper, they get a tracer and an ultra-fine tipped Sharpie. I would not use a pencil because they cannot see it well when it is time for them to cut it out. You can also try a white colored pencil if you would like the students to try and erase. Unfortunately, the construction paper rips easily so I simply stick with the Sharpie.
TEACHABLE MOMENT:
When I use things like tracers, I do not give each child their own trace. Rather, I put two per table of four kids. I find this is a great opportunity to teach the students about sharing and taking turns.
Understanding Symmetry and Line Types
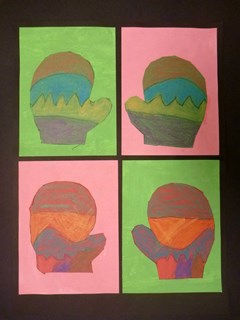
The next step involved teaching the kids about symmetry and line types. For these little guys, I simply explained that symmetry is matching; your mittens need to match. The students then listed for me the line types they knew and I drew them as they called them out. In the end, I made sure they included the specific ones I wanted them to know: straight, zigzag, curved, and wavy.
WHY IS THAT?
I used to teach a host of line types but I started reducing my list since all of the line types I have seen are really based off of two: straight and curved. (…with the option to break any line type just by stopping and starting it; like a moving hiccup!) I thought this idea a little too minimalist, though, so I expanded it to my current four: straight, zigzag, curved, wavy.
I reduced the long list of line types we came up with to keep it simple for them, but I am not going to do that next year when I use this lesson again. I liked the variety that they came up with because I was able to show them how each of the line types they gave me was really based on my original four (actually, two!).
Once we had line types down, the children were given a black crayon and told to draw three. I used three because I wanted to have a large area of color, but you can pick however many you want.
Coloring
 I have tubs of regular crayons and smaller flat containers of construction paper crayons. If you do not have construction paper crayons, get them! They are a great investment. I did not limit or provide guidance on the colors the students could use. So no warm-cool, complimentary, primary, secondary or anything like that.
When we get to the coloring stage of the assignment, I ask the students to do their best to color in the lines. “Scribble scrabble,” as they refer to it, affects the color intensity. I show them that when we do our coloring demo. They all get it, so this isn’t a big deal to them (only to certain adults!).
TEACHABLE MOMENT:
I tell my students coloring in the lines is a choice artists can make. I mention to them that for this project, I would like to see how well they can tell their hand to control the crayon. I review strategies for coloring such as filling in tight spaces and coloring in one direction versus many. This way they understand my expectation: ‘show me however much you can on quality coloring technique.’
Now before my ears start burning from displeased grumblings from of those who disagree, let me just say that I accept a continuum for ‘Mastery’ which is my school’s highest level for grading. ‘Mastery’ for me is sustained control with the crayon. Partial mastery is exactly that: they can do it for part of their work. ‘Satisfactory’ hints at the beginnings of control where crayon cross all lines. ‘Needs Improvement’ shows indiscriminate coloring everywhere on the page. (Students with IEPs and 504s have different levels of expectation and show mastery accordingly.)
Painting
 This year, I had students paint their backgrounds. My students love to paint so I give them the opportunity whenever possible. Even though this was just one color, I was able to reinforce paint brush usage and paint application (i.e., use the tip, not the side of the brush). I may experiment with having a few classes use florescent colored construction paper, but that seems so artificial. Then again, Pop Art wanted to show the commercialism of culture and what better way than with paper that is so bright it risks burning out your eyeballs!?
Gluing
 I wanted my students to practice using a glue bottle at some point this year. Let me start off by saying that I have a love-hate relationship with glue sticks. Sure, they are convenient, but I can not seem to find a quality brand. So, I have convinced myself that teaching kids to use glue bottles is important because it includes both gross- and fine-motor skills. How’s that for self-justification?!
Here are worksheets to have your students practice on:
For my younger students, I tape the worksheet down so it does not shift when they apply the glue. I use Aleene’s Tacky Glue which is very thick and can be problematic though I love its gluing power!
The final gluing onto the black paper is something I do for them on my own time.
View more of my student’s work on Artsonia!
New to The Poetry of Seeing?
Stay in touch, you’ll learn so much: art, inspiration, reviews, and more! Select one of these options to follow along and see the difference art can make at The Poetry of Seeing:
- Click “Follow My Blog” at the top left to receive email updates
- “Like” me after visiting Facebook.com/ThePoetryOfSeeing
- “Follow” me using Twitter.com/@SeeingThePoetry

