 Symmetry is one of those tricky concepts for kids; especially such a young group as kinders. But, as many teachers learn, students can surprise you. Some projects go smoothly because there is a familiarity about the subject that puts students at ease. This project is one of those projects. Ok, I know what you’re thinking–even the boys? Yes, even the boys.

Click to Enlarge
I started by creating two tracers for the top part of the wings for my students to use for their butterfly. I know I once read about this idea somewhere, but I can’t find the exact site. Sorry. The closest I can come to a source was a reference from Marcia Beckett on her site, Art is Basic. She mentions a Facebook comment by Patti Palmer of Deep Space Sparkle.
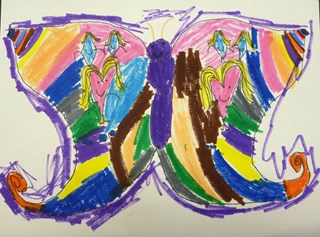
Normally I would have the students trace the shape, but in this case, I did it prior to class so I could keep this to a two-day project. As a class, we looked at butterfly images and talked through what we saw. I kept the discussion open-ended but moving forward. They got all the main points:
- Lots of color
- Different sizes and shapes
- Patterns match on both sides

Click to Enlarge
I asked my students to come to the white board to draw different ways to create the bottom of their butterfly wings. After that discussion, the kids drew the bottom of their wings and then set filling their wings with a matching pattern. Since we have already worked with simple shapes (e.g., circles, squares, etc.), I used basic shapes as the vehicle for creating symmetry on the butterflies. Students drew their designs, outlined them in Sharpie, and then used Crayola markers to color in their designs. I know many on the Web use paint for this type of project (particularly dot paint), but I wanted to use markers since it was a medium we had not used all year.
The results were colorful and full of energy.

