Value is one of the Elements of Art that can be tricky. On the face of it, value refers to dark and light. Once you transition to upper elementary, middle and high school levels, you can explore more fully tints versus tones and all of the nuances that value affords. At the lower elementary grades, though, I find value is important to introduce so students—starting at 3rd grade—begin hearing the term and working with the concept. To help them work at a rudimentary level with value, I have my students create a value landscape. It can fit anywhere into your curriculum, but I have to say it makes a good end of the year project because it is straightforward. I chose to work with tempera cakes for this project. It was a new medium for my 3rd graders and they were quite excited at the prospect of working with a new type of paint. The timeline for this project is swift:
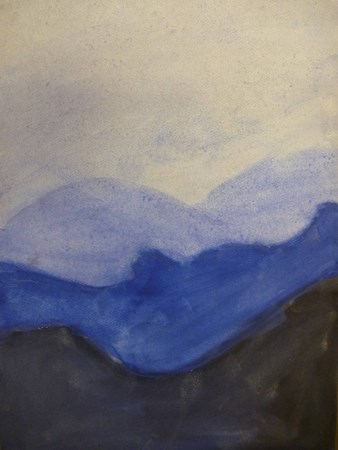
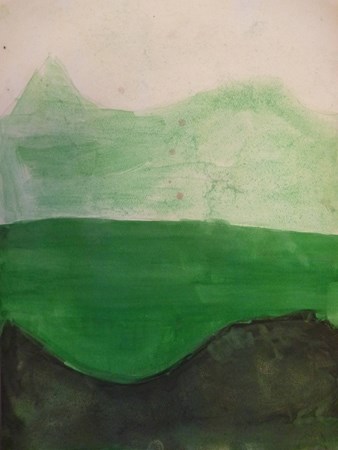
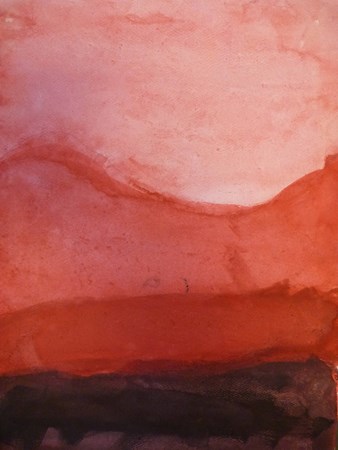
- Students select a color from the tempera cake tray to work with: blue, green, red, or yellow. I didn’t have my students work with black, but you may feel differently.
- The next step involves creating a simple landscape design. This is done by first reviewing line type (straight, wavy, zigzag, curved), then selecting at least two line types to work with, and finally drawing three types of lines from side to side (horizontal) on 9×12 paper. It’s best to vary the distance between the horizontal lines.
- Students mask in what will be the bottom of their landscape with black and then, before the black dries, they paint over it with their chosen color from Step 1.
- After cleaning their brushes, students paint the next section/shape/area above using their chosen color at full strength
- (These next two steps get tricky!) Have students add two dabs of color in the next section/shape/area above and quickly add enough water to spread out the color to create a lighter value than what they painted below. Remind students that the values are going to get progressively lighter as they move from ground (bottom) to sky (top).
- Last step … have students place one maybe two dabs of color and then add enough water to spread out the color to create a value that is even lighter than what they just painted.
This assignment is tough. It looks so much easier than what it is. Before my students do this assignment we walk through the whole process together. I dialog with them as I create my own value landscape with them reinforcing the concept of value (dark and light) and moving from darker to lighter. The end products have a very Turner-esque look to them, especially when you consider William Turner’s later works.