
Okay, I admit I’ve been a loser for not posting student artwork as of late. I’ve had artwork to post, but have allowed other writing topics about art and teaching to distract me. Additionally, I wanted to devote some time creating a Facebook and Twitter presence for The Poetry of Seeing. Now, that they are complete, I have to now allow those to simmer as people discover them. (Do you hate waiting as much as I do? Can I get a witness?)
With this post, I’m going to take us back to the late Fall when I had my Kinders do some stenciling. As I mentioned before, Kindergarten has been learning about the post-World War II art movement, Abstract Expressionism. We initially spent some time with Hans Hofmann and for this little ditty we learned about Jackson Pollock.
Jackson Pollock: The Artist

Jackson Pollock was most noted for his drip paintings where, as the name implies, the artist drips or pours paint onto a canvas. He would also sling paint. While it may look simplistic, the technique is rather involved with the formation of layer upon layer. As a class we talked about how Pollock was very energetic when he painted, sometimes moving into the painting to reach areas or achieve a desired affect. So, footprints and handprints record some of his movements on the canvas which was laid out on the floor of his barn where he painted. Bugs, dust and hair would also become trapped as the paint was built up over sessions of application.
Pollock was reclusive and struggled with alcoholism for much of his life. His addiction ultimately lead to his death at the age of 44 from a car crash. He married Lee Krasner, a fellow artist, and she provided some stability for him during his turbulent life (though that didn’t prevent him from cheating on her later with fellow abstract artist, Ruth Kligman). Despite the troubles haunting his life, Jackson Pollock enjoyed much success during his lifetime as a major artist of his generation.
STEP 1: Do the Bunny Hop
I had students select their own paper from a collection of Autumn-inspired, colored construction paper. We then took red, orange, and yellow tempera paint and used large brushes to ‘bunny hop’ around the paper. I wanted the background to show through so I recommended to the children that they leave some space. Some kids were very deliberate in their placement, others less so. Once the kids cycled through all three colors using the ‘bunny hop’ technique, we moved on to the next step.
STEP 2: Swirly Squirtin’ Fun
I filled up small squirt bottles with five colors: red, yellow, orange, brown, and tan. I had four for each of the five tables in my room. The kids were stationed at each table, beginning with where they normally sit. I gave some directions and showed them a few things not to do. (Sometimes I find the ‘don’ts’ are a better teacher than the ‘do’s’!) Many times I have the kids stand when they paint. I find it keeps them focused, but here it served the purpose of allowing them to move from table to table so they each had a chance to work with all five colors. The kids had a blast. Of course, they would have preferred to squirt out color forever, but all good things must come to an end, right?
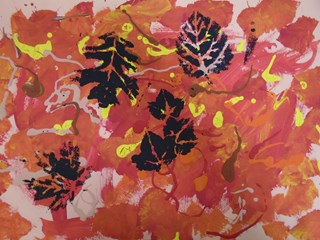
STEP 3: Let Those Leaves Blow
For the last step, the kids needed quite a bit of help. Fortunately, a few of the instructional aides agreed to help me finish this project up. So, we sat with the kids individually to allow them to stencil their leaves. I limited them to four which I should not have; five or six would have worked better. When working with the students, I allowed the kids to rotate the stencil so the leaves were facing the direction they wanted them. I told them to visualize them blowing in the wind.
Much like the ‘bunny hop’ technique I had the children use for the background effect, I demonstrated a similar movement using a sponge with the stencil. Reminding them to get into all of the little nooks and cranes is important. This final step doesn’t take too long, but long enough to realize that this is a time-consuming piece of this puzzle. As a result, it which has made me re-think using stencils with my Kinders.
The stencil I used was from A.C. Moore. I liked the leaf shapes though they were close together which, again, added to the labor intensiveness of using this stencil. I thought about cutting them up, but that would have made them more tricky to work with. I am going to experiment with some alternatives (see below) this Summer.
Lessons Learned
The kids enjoyed this project a great deal. I have since thought of many ways to change up this project for next year. I like it because it is a fun, loose project that teaches color, shape, emphasis, and contrast.
Having said that, though, here are a few recommended changes to this assignment you may want to consider if you try this project on your own:
- Ditch the stenciling because it is very labor intensive for a classroom teacher with 20+ students. I do not mind helping my students, but I generally like activities that allow them to be successful as well as do not frustrate them too much. When they tried the stenciling on their own they did not like that the stencil shifted and their leaves looked like smudges on the paper. I also have a 120 Kindergarteners and it took me two class periods to get done one class without help. (Of course, you can get parents to help or ask any instructional assistants who would be willing to assist you.)
- Use stamps instead of stencils. I am going to purchase some rubber stamps I found at JoAnn Fabrics and experiment with those. I also found a leaf print set at Dick Blick but they did not get good reviews so I’m hesitant to purchase them with my budget money. In the end, I may end up trying my hand at making my own stamps. Have you used stamps with young kids? Comment below and let me know what your experience has been like?
- Choose large squirt bottles, not small ones. The kids want to use a lot of paint, and who am I to stop them? Pollock layered his work so they should too. So, I will be sure to get larger squirt bottles to make it easier for them to use more paint. I’ll have to see how this goes with some of my more petite students since they had trouble squeezing the small bottles. The large ones may be too cumbersome for them.
More Student Work
In addition to the work below, you can see this project and more by visiting Artsonia.


New to The Poetry of Seeing?
Stay in touch, you’ll learn so much: art, inspiration, reviews, and more! Select one of these options to follow along and see the difference art can make at The Poetry of Seeing:
- Click “Follow My Blog” at the top left to receive email updates
- “Like” me after visiting Facebook.com/ThePoetryOfSeeing
- “Follow” me using Twitter.com/@SeeingThePoetry

